Need more help?
If you have additional questions about exporting your leads, let us know at support@openhomepro.com
|
Home → Free Accounts → Printer Friendly Version Free Accounts
1. General Information1.1. Overview
With the Free Version, you can host & schedule unlimited Open Houses. You can also add unlimited Listings. However, you can only manage your FIRST 25 leads. If you would like to view and manage leads beyond your first 25, you will need to upgrade to the Premium version of the app for either $25/month or $240 annually ($20/month paid annually). Click here to learn how to upgrade your account. 1.2. Difference Between Free and Premium Version
The free Open Home Pro plan includes a digital sign-in sheet with the ability to record visitor notes, lead exporting from the app, and shareable single-property websites. It's great for any agent who wants just the basics. If you have additional questions about the differences between regular Open Home Pro® and Open Home Pro® Premium, let us know at support@openhomepro.com. 1.3. Follow Up Emails
Note: The ability to customize all the templates is available on the Premium Version only. Click here to learn how to upgrade your account. The Follow Up emails are available for your first 25 leads. By default, these are sent automatically when an open house is closed. To learn how to monitor this email, check out this support article. You can easily disable this from the app by following the steps below.
Need more help? If you have additional questions about thank you emails, let us know at support@openhomepro.com 1.4. How To Check If Follow Up Emails Are Sent
This article will show you how to check if a lead has received and opened your automated emails. There are different methods to do this so be sure to scroll to the correct instructions for your device. To ensure that your Follow Up Emails are sent out, you must first follow the instructions in this support article that will show you how to turn these emails on. Then, verify that you are connected to wifi (or connect to wifi after the Open House). Instructions for iPad Log in to your account and tap "All" under "Leads". Tap on the lead that you want to monitor. This will bring you to the lead details page. Tap on "Emails Stats" to view all the emails that were sent for this specific lead and from here you can view the status and other details related to that email.
Instructions for Android Log in to your account and tap "All" under "Leads". Tap on the lead whose email status you want to monitor. This will bring you to the lead details page. Tap on "Emails Stats" to view all the emails that were sent for this specific lead and from here you can view the status and other details related to that email.
Instructions for Website You can view Email Stats for each individual lead by logging into your account on openhomepro.com and clicking on the Leads tab. Select a Lead from the left-hand side of the page. You can then view a lead's Contact Information, Email Stats, and the answers to the Questions that you asked during the Open House. Email Stats will show you the status of the email (delivered, bounced, etc.), the date and time that the email was sent, and if or when the email was opened.
Need more help? If you have additional questions about thank you emails, let us know at support@openhomepro.com 1.5. How to Upgrade your Account
Sign in to your account. By default, you will see your "Listings" > "All" section. At the bottom of the screen, you will see the option to upgrade. Tap "LEARN MORE". Your screen will display a message comparing the FREE and PREMIUM version. You can either skip or tap on the next button to learn more until you reach the last message which will then prompt you to the purchase page. On this page, you will have the option to choose Annual or Month-to-Month subscription that is subject to auto-renewal. Next, complete your information details by adding your name and card information. Tap "Subscribe" to complete your purchase. You can also tap on the locked features on each section of your account. This will give you the option to upgrade to the Premium version. 1.6. How to Add Leads as Contacts for iPad
This article will show you how to integrate your leads automatically into your iPad contacts. This can be a helpful way to easily access and follow up with potential clients that have visited your open house Allowing OHP to Access Your Contacts In order to allow your leads to transfer to your Contacts App on your iPad, you will first want to make sure that you allow Open Home Pro to have access to the Contacts App. To set this up you will want to go into your Settings for your iPad and select Open Home Pro. Make sure that the Contacts option is toggled on.
Sending your leads to contacts through Open Home Pro Once you’ve granted OHP access to your Contacts, you will want to open your Open Home Pro App and click on Settings in the bottom right-hand corner. Select Lead Settings. Once you are in the Lead Settings area, toggle the Add Lead to Contacts option to the on position. Once this is set up, your lead’s contact information and the answers to the questions that you asked at the Open House will be transferred over to the Contacts App on your iPad each time you sync the app. At this time, past leads from previous Open Houses will not be synced with the Contacts App, after this feature is enabled. Only new leads moving forward will be added to the Contacts App. Need more help? If you have additional questions about exporting your leads, let us know at support@openhomepro.com 2. Creating a Listing2.1. iPad
There are different methods on how to do this depending on the device you’re using. This article will walk you through creating a new listing using your iPad. Click here if you are using an Android device. Publishing a Listing on Open Home Pro When you create a listing on Open Home Pro, we will notify by email that the listing has been published. This simply means the listing has been created, and that it now exists for you to run an open house and collect leads. Your listing is only available on OpenHomePro.com from the link we provide you in the email. You can also access this link at any time from the app (iPad users only) or through OpenHomePro.com. Click here to find out more on how to access the listing URL. Keep in mind that the listing URL only exists for you to share or promote it, but if you choose not to, it cannot easily be found or seen by consumers. To start, log into your account. By default, you will see your "Listings" > "All" section. Tap on the "+Create New Listing" button. This will bring up a pop-up window where you can start to set up your listing. Here you can enter your listing's street address and zip code. All US addresses will prompt a search. However, if you want to manually type in the address and not choose from any of the search results or if your address is not listed, simply tap the back arrow. This will return to the previous page where you can freely type the address. When all the information is correct, tap the "Create Listing button". This will bring you to your Listing page. Here, you can tap certain attribute fields to input information, such as price, property type, square footage, bedrooms, and baths. For example, let’s say you wanted to input the listing’s price. You would first want to tap on the price field. This will bring up a pop-up window where you can type in the price of the listing. Once you’ve inputted the price, click “Done”. This information, like all of the other attribute fields you set up on the listing page, will be saved automatically. Need more help? If you have additional questions about creating a listing, let us know at support@openhomepro.com. 2.2. Android
There are different methods on how to do this depending on the device you’re using. This article will walk you through creating a new listing using your Android device. Click here if you are using an iPad. To start, log into your account. By default, you will see your "Listings" > "All" section. Tap on the "+Create New Listing" button. This will bring up a pop-up window where you can start to set up your listing. Here you can enter your listing's street address and zip code. All US addresses will prompt a search. However, if you want to manually type in the address and not choose from any of the search results or if your address is not listed, simply tap the back arrow. This will return to the previous page where you can freely type the address. When all the information is correct, tap the "Create Listing button". This will bring you to your Listing’s page. Here, you can tap certain attribute fields to input information, such as price, property type, square footage, bedrooms, and baths. For example, let’s say you wanted to input the listing’s price. You would first want to tap on the price field. This will bring up a pop-up window where you can type in the price of the listing. Once you’ve entered the price, select “Done”. This information, like all of the other attribute fields you set up on the listing page, will be saved automatically. To add your first picture to the listing, start by tapping on the “Touch to Add” button or the camera icon. This will bring up the option to select a photo from your "Photo Library" or take a picture directly using the device's "Camera". When you have selected your first picture, click "OK" To add more photos, tap on the camera icon on the left. Need more help? If you have additional questions about creating a listing, let us know at support@openhomepro.com. 2.3. Website
Go to www.openhomepro.com and sign in to your account with your username and password. On the main Listings page, click “Create a Listing”. This will bring up your Create a Listing page, where you can set up your listing and all of its attributes. Once you’ve filled in these fields, select "Create Listing". Keep in mind that you can also make edits to your listing at any time through OpenHomePro.com. Need more help? If you have additional questions about creating a listing, let us know at support@openhomepro.com 3. Editing an Existing Listing3.1. iPad
There are different processes on how to do this depending on the device you’re using, so be sure to scroll to the correct instructions for your device. This article will walk you through how to make changes to your existing listings using your iPad device. Click here if you are using an Android device. To begin, select “All” under Listings in the control menu towards the left. This will bring you to an index of all of your listings. Tap on the listing that you’re looking to edit. You can edit any of the listing’s attributes by simply tapping on the category that you’re trying to edit (such as Price or Property Type). Here, you can type in what you’re trying to change the category to. For example, let’s say you wanted to change the price. You would need to first click on the current price to edit it.
After tapping on the price field, you are then going to be brought to a screen where you can type in the new price. Once you’ve typed in the price you’re looking to change the listing to, select “Done”. This information, like all of the other attribute fields, will be saved automatically.
If you would like to update the status of the listing, tap on the field in the top right that displays the listing’s current status. Here, you will be able to change the status to any of the options presented in the pop-up menu. Keep in mind, that the visitors will receive an automated email to alert them of any status changes you make to the listing through the app but you can turn this off from your Email settings. Need more help? If you have additional questions about editing a listing, let us know at support@openhomepro.com 3.2. Android
There are different processes on how to do this depending on the device you’re using. This article will walk you through how to make changes to your existing listings using your Android device. Click here if you are using an iPad device. To start, log into your account. By default, you will see your "Listings" > "All" section. You will see all of your listings indexed in the right column. Tap on the listing that you’re trying to edit. You can edit the listing information towards the right of the screen. To make adjustments, click on the specific field that you’re trying to edit, type in the new/corrected data, and then select “Okay”. For example, let's say you wanted to edit the price of the listing. You would want to first click on the price field. After clicking on the price, you are then going to be brought to a screen where you can type in the new price. After typing in the adjusted price, select "Done". After you have finished making all of the changes to the property, all of the updated information will be saved and displayed automatically. Keep in mind, that the visitors will receive an automated email to alert them of any status changes you make to the listing through the app, which you can from the drop-down button beside the property address. Need more help? If you have additional questions about editing a listing, let us know at support@openhomepro.com 3.3. Website
First, you will want to go to www.openhomepro.com and sign in to your account with your username and password. On the main Listings page, scroll down to the listing that you're trying to edit and click on the “Manage Listing” button. This will bring up your main Listing page, where you can edit your listing and all of its attributes. Simply click on the field that you're trying to edit and fill in the corrected data. Once you've finished updating your listing details, be sure to click on the "Update Listing Details" button towards the bottom of the page to ensure that information is saved successfully. You can make adjustments to the status or price of the listing by going into the "Price & Status" tab. Keep in mind, that the visitors will receive an automated email to alert them of any status changes you make to the listing but you can turn this off from your Email Settings. You can make changes to the pictures by clicking on "Photos". Here, you can remove previously added photos or you can upload new pictures. Wait for the page to load and your changes should be saved automatically. Need more help? If you have additional questions about editing a listing, let us know at support@openhomepro.com 4. Sharing a Listing4.1. iPad
Many agents like to share and promote their listings before their open house. There are different processes on how to do this depending on the device you’re using. This article will walk you through how to share listings using your iPad device. Click here if you are using an Android device. First, you will need to navigate to the listing that you’re trying to share. On the main dashboard of the Open Home Pro app, select “All” under Listings in the control menu towards the left. This will bring you to an index of all of your listings. Tap on the listing that you’re looking to share. You will then be brought to the listing page. When tapping on “Share to Facebook”, this will share your listing on your Facebook page. Before selecting this option, you will want to make sure you are signed into the Facebook account that you would like to post your listing to on your iPad. After tapping on the 'Share to Facebook' button on the right-hand side of the screen, select “Post”. To view your other options, tap on the share icon in the top right corner. This will bring a dropdown of share options.
Need more help? If you have additional questions about editing a listing, let us know at support@openhomepro.com 4.2. Android
Many agents like to share and promote their listings before their open house. There are different processes on how to do this depending on the device you’re using. This article will walk you through how to share listings using your iPad device. Click here if you are using an iPad device. To start, log into your account. By default, you will see the "Listings" > "All" section. You will see all of your listings indexed in the right column. Tap on the listing that you’re trying to share. This will bring you to your Listing’s page. You can directly "Share to Facebook" or tap the share icon on the upper right corner of the screen which will bring a pop-up window showing other different sharing options. When tapping on the Facebook icon, this will share your listing on your Facebook page. Before selecting this option, you will want to make sure you are signed into the Facebook account that you would like to post your listing to on your iPad. This with bring you to a pop up window where you can preview the Facebook post. When you're ready to share the listing, select “Post”. When selecting “Twitter”, you can share your listing as a tweet through your Twitter page. Like Facebook, make sure you are signed into your Twitter account on your iPad beforehand. This will bring up a pop-up window where you can preview the tweet. When you're ready to share the listing, select "Tweet". Need more help? If you have additional questions about editing a listing, let us know at support@openhomepro.com 4.3. Website
Many agents like to share and promote their listings before their open house. There are different processes on how to do this depending on the device you’re using. This article will walk you through how to share listings directly through OpenHomePro.com. When logged into your account through OpenHomePro.com, you have the ability to share your listings on Facebook, Twitter or by using the listing URL. First, you will want to go to www.openhomepro.com and sign in to your account with your username and password. On the main Listings page, scroll to the listing you want to share. To share the listing on your Facebook page, click the “Like” below the listing photo. You'll then be taken to either a “Facebook Login” or “Share on Facebook” pop-up window. Next, choose the appropriate profile or page on Facebook that you would like to share the listing to. This is particularly helpful if you are trying to share your listing on your Facebook business page rather than your general Facebook profile. Once selected, click on “Post” to share the listing. To share the listing on your Twitter page, click the “Tweet” button. You'll then be taken to a pop-up window where you can log in (if need be) and tweet the link for your listing. When you’re ready to share the listing, click on the “Post” button in the pop-up window. Listing URL To access the listing URL, click on the "Manage Listing" button, and navigate to the Property Details tab. When scrolling down the screen, you will see the Property Listing URL above the Description box. By sharing the listing URL through other venues, such as through email, you can promote your listing and open house. Need more help? If you have additional questions about editing a listing, let us know at support@openhomepro.com 5. Editing or Removing Listing Images5.1. iPad
This article will show you how you can rearrange and remove your listing images through your iPad. Click here if you are using an Android device. To begin, select “All” under Listings in the control menu towards the left. This will bring you to an index of all of your listings. Tap on the listing that you’re looking to edit photos for. You will then be brought to the main listing page. Here, tab on the camera icon, located above the listing attributes. Tap on “Edit Photos”. To rearrange the order of your listing photos, simply tap on the image and drag it up or down to the desired order that you’re looking to set. To remove an image from a listing, tab on the image and drag it towards the left. This will bring up a red delete button to the right of the image. Tap on “Delete” to remove the photo. Once you’ve finished making your edits to the listing photos, click “Done” in the top right of the Photos pop up window. Any edits you make in this section will be saved automatically. Need more help? If you have additional questions about editing a listing, let us know at support@openhomepro.com 5.2. Android
This article will show you how you can rearrange and remove your listing images through your iPad. Click here if you are using an iPad device. To start, log into your account. By default, you will see the "Listings" > "All" section. You will see all of your listings indexed in the right column. Tap on the listing that you’re trying to remove photos for. This will bring you to the main listing page. Next, you will want to tap on the “Photos” tab, located to the left of the listing details. Swipe up to reveal the "Edit Photos" option. From the listing’s photo library, you can reorder the images by pressing the photo and dragging it according to which order you would like to photo to appear. To remove a photo, tap on the minus or delete " - " symbol on the left side of the banner. After removing the photo from your listing, the changes should sync and save automatically. Need more help? If you have additional questions about editing a listing, let us know at support@openhomepro.com 5.3. Website
This article will walk you through how you can rearrange and remove your listing images directly through OpenHomePro.com. First, go to www.openhomepro.com and sign in to your account with your username and password. On the main Listings page, scroll to the listing you want to upload images to, and click “Manage Listing”. Next, click on the "Photos” tab to access the images library for the listing. To rearrange the order of the photos, simply click on the image that you’re trying to move, and drag it to the desired spot between your other images. Keep holding the image until a blank grey box appears in the spot you're looking to place the image. Once the grey box appears, release the photo. To remove a photo, click on the white "X” in the top right corner of the image thumbnail. After you are done rearranging and/or removing the photo(s) from your listing, the changes should sync and save automatically. Need more help? If you have additional questions about editing a listing, let us know at support@openhomepro.com 6. Uploading Photos to a Listing6.1. iPad
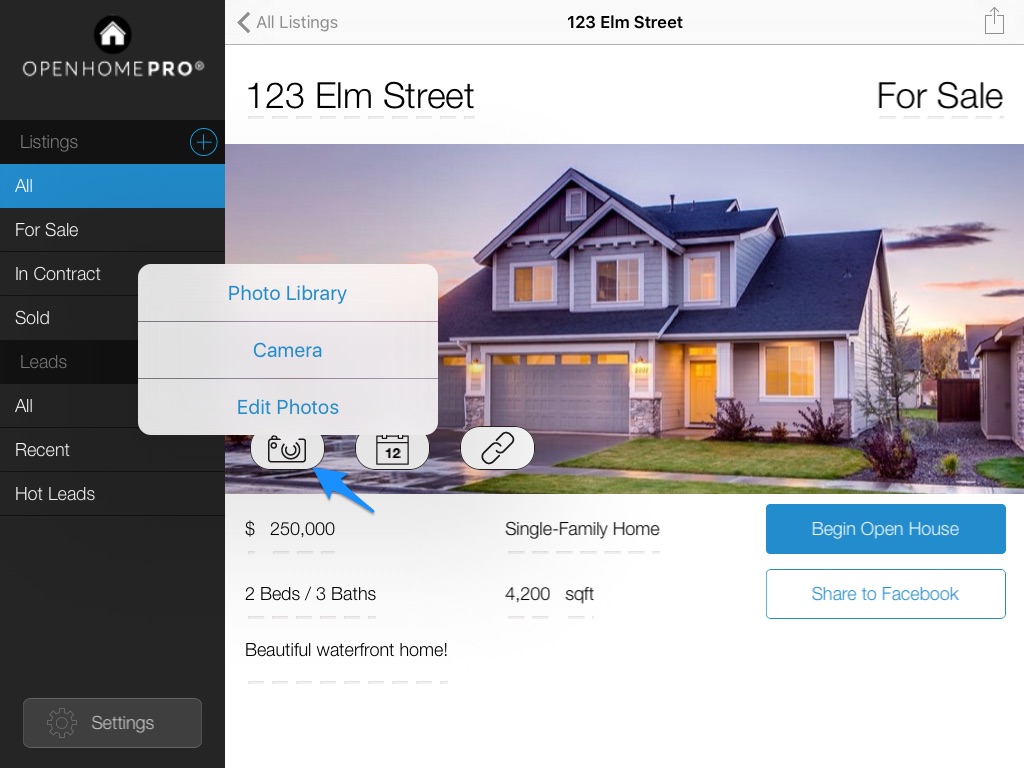
This article will show you how you can upload images to your listing through your iPad. Click here if you are using an Android device. To begin, select “All” under Listings in the control menu towards the left. This will bring you to an index of all of your listings. Tap on the listing that you’re looking to upload pictures to. You will then be brought to the main listing page. Here, tab on the camera icon, located above the listing attributes.
When tapping on “Photo Library” you have the ability to select images that you have saved in your iPad library. When tapping on “Camera” you have the ability to take photos directly with the camera on you iPad, which will be added to your listing. Keep in mind that if you take photos with the iPad Camera application while the iPad is not oriented correctly, your photos may appear upside down. When taking a photo using the iPad's camera application (not the camera function inside of Open Home Pro®) ensure that the iPad Home Button is closest to your right thumb and the rear camera is closest to the ceiling and your left hand. However, if you take a photo with the Home Button closest to your left thumb and the rear camera closest to the floor and your right hand the picture will display upside down. Need more help? If you have additional questions about editing a listing, let us know at support@openhomepro.com 6.2. Android
This article will show you how you can upload images to your listing through your Android device. Click here if you are using an iPad device. To start, log into your account. By default, you will see your "Listings" > "All" section. You will see all of your listings indexed in the right column. Tap on the listing that you’re trying to upload images to. You will then be brought to the main listing page. Next, you will want to tap on the “Photos” tab, located to the left of the listing details. Within the photos tab, you can either upload a picture from the "Photo Library" or take a photo directly with your Android camera. Need more help? If you have additional questions about editing a listing, let us know at support@openhomepro.com 6.3. Website
This article will show you how you can upload images to your listing directly through OpenHomePro.com. First, you will want to go to www.openhomepro.com and sign in to your account with your username and password. On the main Listings page, scroll to the listing you want to upload images to, and click “Manage Listing”. Next, click on the “Photos” tab. This will bring you to the section where you can upload images to your listing. You have a couple of options on how to do this through www.openhomepro.com. First, you can upload images directly through your computer when clicking on the computer icon. You can drag a photo into the uploader, or you can click on “Choose Photos” to select the image file. You also have the option to upload images from your Facebook account. After clicking on the Facebook icon, click on the “Connect to Facebook” to sign into your Facebook account so that you can access and upload your Facebook photos. When clicking on the chain icon, you have the ability to upload any photo off of the internet. All you need to do here, is post the URL of the photo, and it will upload to the listing. Please be sure to only use photos for which you have permission to use. Once you have uploaded your photos from whichever option you choose, please be sure to press the "Done" button to save the photos to the listing. Need more help? If you have additional questions about uploading and changing photos, let us know at support@openhomepro.com 7. Removing a Listing7.1. iPad
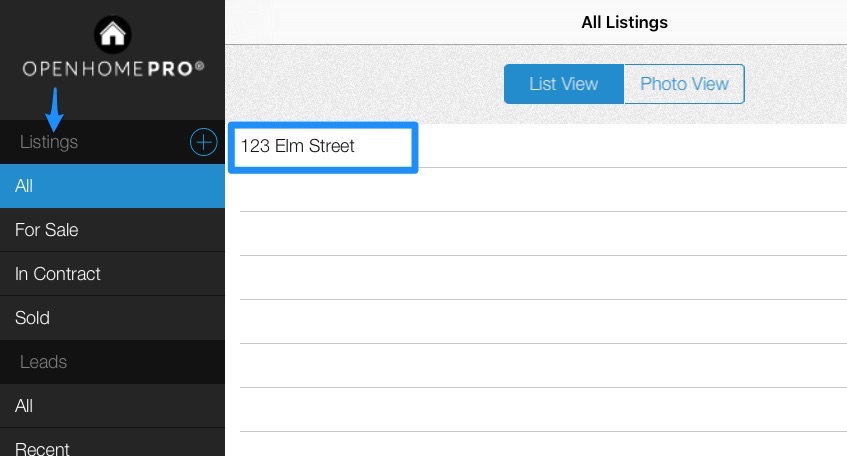
This article will show you how you can remove a listing through your iPad. Click here if you are using an Android device. To begin, select “All” under Listings in the control menu towards the left. This will bring you to an index of all of your listings.
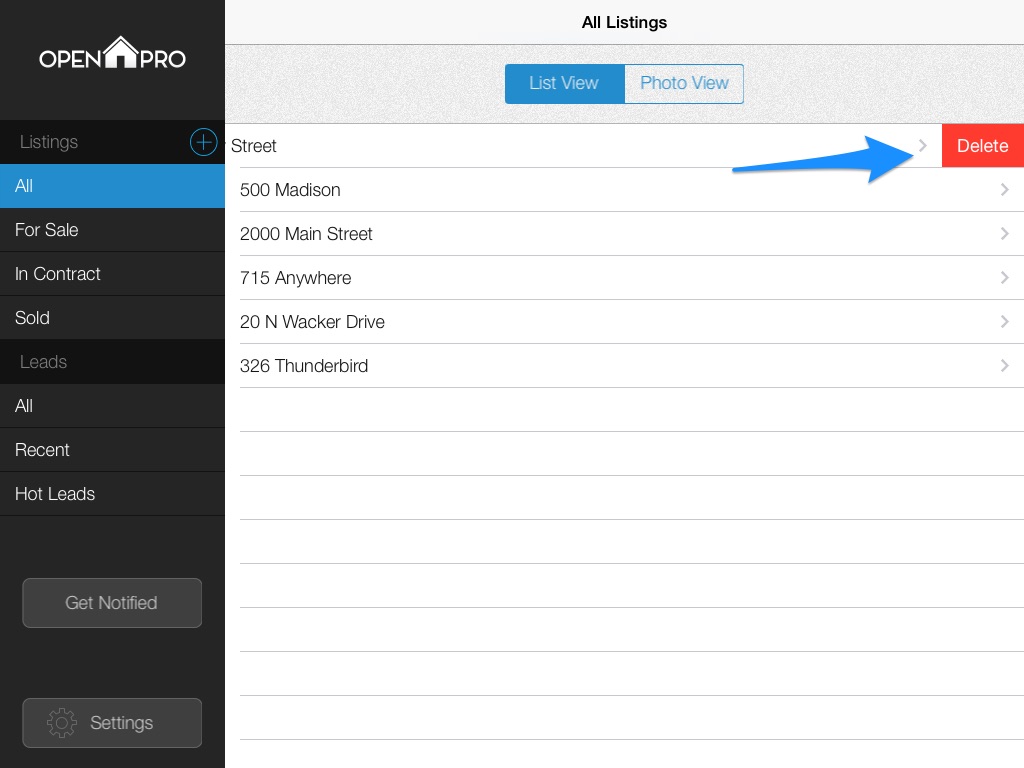
Next, you will want to swipe towards the left on the listing you wish to delete. This will bring up a red button towards the right of the listing. Tap on this red button to delete listing.
Please note that once a listing is deleted, it cannot be recovered. That being said, any leads you collect from that listing will be saved in your account. Need more help? If you have additional questions about editing a listing, let us know at support@openhomepro.com 7.2. Android
This article will walk you through how to remove a listing through your Android device. Click here if you are using an iPad. To start, log into your account. By default, you will see your "Listings" > "All" section. You will see all of your listings indexed in the right column. Tap on the listing that you’re trying to remove. This will bring you to the listing’s page. To delete the listing, tap on the "Trash" icon on the upper right corner or the screen. Note that once a listing is deleted, it cannot be recovered. Any leads you collect from that listing will be saved in your account. Need more help? If you have additional questions about removing a listing, let us know at support@openhomepro.com. 7.3. Website
This article will show you how you can remove a listing directly through OpenHomePro.com. First, go to www.openhomepro.com and sign in to your account with your username and password. On the main Listings page, scroll to the listing you want to remove and click on the “Manage Listing” button. This will bring you to the main listing page. Click on the “Property Details” tab. Once you’re on the Property Details page, you will then want to scroll down to the bottom of the page. Finally, click on the “Delete Listing” link. Please note that once a listing is deleted, it cannot be recovered. That being said, any leads you collect from that listing will be saved in your account. Need more help? If you have additional questions about uploading and changing photos, let us know at support@openhomepro.com 8. Starting an Open House8.1. iPad
Creating a Listing Before running an open house, you will need to make sure that you've created a listing page for the listing you're planning on running an open house for first. For more information on how to do this, click here. Instructions for iOS Log in to your account. By default, your screen will show you an index of all of your listings. Tap on the listing that you want to set up for open house. This will take you to the listing page, where you will be able to tap on the "Begin Open House" option. The main screen for your open house will feed the first 5 images you have uploaded to your listing page. During an open house, your visitors will be able to sign in and enter their contact information.
After someone has signed in, you have options to add notes to the lead or end the open house. To complete either of these options, tap the house icon in the top left-hand corner. Need more help? If you have additional questions about creating a listing, let us know at support@openhomepro.com 8.2. Android
Before running an open house, you will need to make sure that you've created a listing page for the listing you're planning on running an open house for first. For more information on how to do this, click here. To start the open house, log into your account. By default, you will see your "Listings" > "All" section. You will see all of your listings indexed in the right column. Select the listing that you want to start the open house and tap "Begin Open House". A pop-up message will appear every time you run an open house to display a few reminders. Select "OK" to close the message.
The main screen for your open house will feed the first 5 images you have uploaded to your listing page. Visitors can sign in and enter their contact information by tapping the "Touch to Sign In" button. This is an example of what it will look like when a visitor is prompted to enter their contact information: After the visitor answers questions, Open Home Pro will confirm that the guest is signed in. Then, you will return back to the "Sign In" page for the next guest. After everyone has signed in, you need to end the open house by tapping the house icon in the upper left corner. Need more help? If you have additional questions about starting an open house in Open Home Pro, let us know at support@openhomepro.com 8.3. Visit Report
NOTE: The Free version of the app enables you to schedule and host as many open houses as you would like, and capture all leads, but you are limited to receiving email reports, viewing, and managing your first 25 leads only. A Visit Report is automatically sent after each open house to the email address associated with your Open Home Pro® account. This email contains details on each lead you collected that day. We recommend manually syncing your Open Home Pro® app with the web after each event - even if you had a data connection during the Open House - to ensure your Visit Report will be complete, accurate, and on time. Need more help? If you have additional questions about removing a lead from the Open Home Pro app, let us know at support@openhomepro.com. 8.4. Ensuring Visitors only have Access to the Open Home Pro® App during an Open House
In order to ensure visitors to your open house only have access to Open Home Pro® and not your other applications please follow the steps outline below. This feature is called Guided Access.
Need more help? If you have additional questions about Guided Access, let us know at support@openhomepro.com 9. Scheduling an Open House9.1. iPad
Many agents like to share and promote their Open House with Open Home Pro. There are different processes on how to do this depending on the device you’re using. This article will walk you through how to share listings using your iPad. Click here if you are using an Android device. To begin, select “All” under Listings in the control menu towards the left. This will bring you to an index of all of your listings. Tap on the listing that you’re looking to schedule your open house for. This will bring you to your listing’s page. Next, you will want to tap on the calendar icon, located above the listing details. This will bring up a pop-up window where you’re able to set a date and time for your open house. Just tap on the "Date" and "Time" sections to modify the information. Next, tap on the "Save" button to save the changes. Need more help? If you have additional questions about editing a listing, let us know at support@openhomepro.com 9.2. Android
This article will walk you through how to schedule an open house using your Android device. Click here if you are using an iPad. To start, log into your account. By default, you will see the "Listings" > "All" section. You will see all of your listings indexed in the right column. Click on the listing that you’re trying to schedule an open house for. This will bring you to your listing’s page. Next, tap on the “Calendar” icon located within the listing image. This will bring up the slider where you’re able to set a date and time for your open house. You can simply tap on the fields to set the date and time. When you are done setting the date and time, tap the "Save" button to save the changes. Need more help? If you have additional questions about editing a listing, let us know at support@openhomepro.com 9.3. Website
This article will show you how you can promote your Open House directly through OpenHomePro.com First, go to www.OpenHomePro.com and sign in to your account with your username and password. On the main Listings page, there are two different ways you can schedule your open house for your listing. You can either click on the pencil icon next to "Schedule an Open House" or click on the “Manage Listing” button, and go into the "Open House" tab. Both ways will lead you to the section where you can schedule your open house. You have the ability to edit your open house at any time, by going into this same section and clicking on the field that you're trying to edit. You also have the ability to cancel the open house at any time by clicking on the "Cancel Scheduled Open House" link. Need more help? If you have additional questions about scheduling or changing times, let us know at support@openhomepro.com 10. Exporting Leads10.1. How to configure your Mail App for lead export
NOTE: The Free version of the app enables you to schedule and host as many open houses as you would like, and capture all leads, but you are limited to receiving email reports, viewing, and managing your first 25 leads only. This article will connect you to the resources you need to set up you Mail App on iPad or Android. Why do I need to set up my Mail App? In order to export your leads from your Open Home Pro App you will need to make sure that your Mail App is configured onto your iPad or Android tablet. Leads are exported to a .CSV file attached to an email that must be generated through the Mail App on your device. How do I set up my Mail App? Both Apple and Google (the company behind Android) provide instructions on how to set up mail on your portable device. iOS: If you are using an iPad you will want to follow the instructions in this Apple Support article to set up your Mail App:https://support.apple.com/en-us/HT201320 Android:If you are using an Android tablet you can follow the instructions in this article:http://www.dummies.com/consumer-electronics/tablets/android-tablets/how-to-set-up-e-mail-on-your-android-tablet/ Need More Help? If you have additional questions about setting up your lead export, let our support team know at support@openhomepro.com. 10.2. iPad
NOTE: The Free version of the app enables you to schedule and host as many open houses as you would like, and capture all leads, but you are limited to receiving email reports, viewing, and managing your first 25 leads only. Leads will only be present on your iPad device until they are successfully exported to your laptop or desktop computer. In order to export your leads successfully, you will need to make sure that your mail app is configured properly. Open the app, and tap “All” under “Leads” on the left menu. Then tap the “Export Leads” button at the top of the screen. This will export them to a .CSV file which will automatically attach to an email. Send that email to yourself, then log in to your email and access the attachment using any software that reads .CSV files. Need more help? If you have additional questions about exporting your leads, let us know at support@openhomepro.com 10.3. Android
NOTE: The Free version of the app enables you to schedule and host as many open houses as you would like, and capture all leads, but you are limited to receiving email reports, viewing, and managing your first 25 leads only. This article will explain how to export your leads from your mobile device to your computer. Leads will only be present on your Android device until they are successfully exported to your laptop or desktop computer. In order to export your leads successfully, you will need to make sure that your mail app is configured properly. Open the app, and tap “All” under “Leads” on the left menu. Then tap the “Export Leads” button at the top of the screen. This will export them to a .CSV file which will automatically attach to an email. Send that email to yourself, then log in to your email and access the attachment using any software that reads .CSV files. Need more help? If you have additional questions about exporting your leads, let us know at support@openhomepro.com. 11. Syncing Leads11.1. Automatically syncing your leads
NOTE: The Free version of the app enables you to schedule and host as many open houses as you would like, and capture all leads, but you are limited to receiving email reports, viewing, and managing your first 25 leads only. This article will explain how lead syncing works as well as how to sync your leads manually if necessary. When your open house is over it is always important to follow the steps below to make sure that your leads sync and so you can view them on your computer. First, you will need to close your open house. To do this, select the Open Home Pro logo in the upper left-hand corner. Next, choose the"End Open House" option. Lastly, begin the automatic sync by connecting your tablet to a wifi. It is always good to double-check that your WiFi signal indicator looks like it does below with full strength signal. This helps guarantee a successful upload.
As soon as you connect your tablet to wifi leads should be viewable and have the ability to export. Important note: You will need to make sure that your default email is set up in order to do this 11.2. Manually Syncing Leads
NOTE: The Free version of the app enables you to schedule and host as many open houses as you would like, and capture all leads, but you are limited to receiving email reports, viewing, and managing your first 25 leads only. This article will explain how lead syncing works as well as how to sync your leads manually if necessary. When your open house is over it is always important to follow the steps below to make sure that your leads sync so you can view them on your computer. There are different methods on how to do this depending on the device you’re using, so be sure to scroll to the correct instructions for your device. iPad Make sure that your iPad is connected to a strong WiFi signal, then follow the steps below. 1. Log in to your account You will know that you have successfully synced your leads because it will show on your Settings > Sync (Last Updated - Date of last sync) Android Make sure that your iPad is connected to a strong WiFi signal, then follow the steps below. 1. Log in to your account You will know that you have successfully synced your leads because it will show on your Settings > Sync (Last Updated - Date of last sync) Need more help? If you have additional questions about your visit report email, let us know at support@openhomepro.com. 12. Changing Lead Details12.1. iPad
NOTE: The Free version of the app enables you to schedule and host as many open houses as you would like, and capture all leads, but you are limited to receiving email reports, viewing, and managing your first 25 leads only. Click here to learn how to upgrade your account. Once you have run your open house you may find it necessary to either modify details about your leads or add additional notes. Through Open Home Pro, you can modify any details about any lead you have collected using your iPad. Click here if you are using an Android device. Press on the “All” leads button on the left-hand side of the screen then find the lead whose data you want to modify. These are sorted by most recent.
Touch the data you want to change, such as name, email address, or phone number. If you want to add notes, tap on the "Notes" category below the address. Once you’re done modifying, simply press “Done” to update the lead’s information. Need more help? If you have additional questions about changing your lead details, let us know at support@openhomepro.com 12.2. Android
NOTE: The Free version of the app enables you to schedule and host as many open houses as you would like, and capture all leads, but you are limited to receiving email reports, viewing, and managing your first 25 leads only. Once you have run your open house you may find it necessary to either modify details about your leads or add additional notes. Through Open Home Pro, you have the ability to modify any details about any lead you have collected using your Android Device. Click here if you are using an iPad. Press on the “All” leads button on the left-hand side of the screen then find the lead whose data you want to modify. These are sorted by most recent. Tap into the Notes field to add any updates you like and select "Done". A confirmation will show at the bottom indicating that you have successfully saved the changes. If you have additional questions about changing your lead details, let us know at support@openhomepro.com |